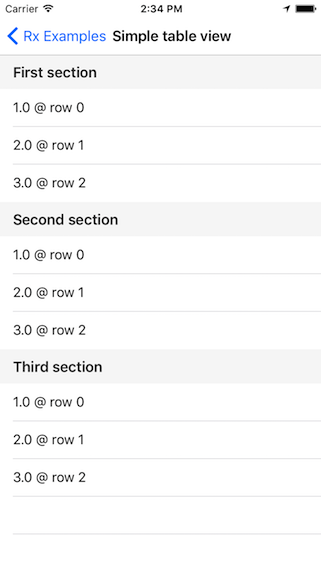
TableViewSectionedViewController - 多层级的列表页
演示如何使用 RxDataSources 来布局列表页,你可以在这里下载这个例子。
简介
这是一个多层级列表页,它主要需要完成这些需求:
- 每个
Section显示对应的标题 - 每个
Cell显示对应的元素以及行号 - 根据
Cell的indexPath控制行高 - 当
Cell被选中时,显示一个弹框
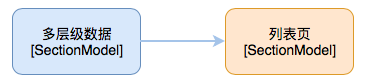
整体结构
以上这些需求,只需要一页代码就能完成:
class SimpleTableViewExampleSectionedViewController
    : ViewController
    , UITableViewDelegate {
    @IBOutlet weak var tableView: UITableView!

    let dataSource = RxTableViewSectionedReloadDataSource<SectionModel<String, Double>>(
        configureCell: { (_, tv, indexPath, element) in
            let cell = tv.dequeueReusableCell(withIdentifier: "Cell")!
            cell.textLabel?.text = "\(element) @ row \(indexPath.row)"
            return cell
        },
        titleForHeaderInSection: { dataSource, sectionIndex in
            return dataSource[sectionIndex].model
        }
    )

    override func viewDidLoad() {
        super.viewDidLoad()

        let dataSource = self.dataSource

        let items = Observable.just([
            SectionModel(model: "First section", items: [
                    1.0,
                    2.0,
                    3.0
                ]),
            SectionModel(model: "Second section", items: [
                    1.0,
                    2.0,
                    3.0
                ]),
            SectionModel(model: "Third section", items: [
                    1.0,
                    2.0,
                    3.0
                ])
            ])


        items
            .bind(to: tableView.rx.items(dataSource: dataSource))
            .disposed(by: disposeBag)

        tableView.rx
            .itemSelected
            .map { indexPath in
                return (indexPath, dataSource[indexPath])
            }
            .subscribe(onNext: { pair in
                DefaultWireframe.presentAlert("Tapped `\(pair.1)` @ \(pair.0)")
            })
            .disposed(by: disposeBag)

        tableView.rx
            .setDelegate(self)
            .disposed(by: disposeBag)
    }

    // to prevent swipe to delete behavior
    func tableView(_ tableView: UITableView, editingStyleForRowAt indexPath: IndexPath) -> UITableViewCell.EditingStyle {
        return .none
    }

    func tableView(_ tableView: UITableView, heightForHeaderInSection section: Int) -> CGFloat {
        return 40
    }
}
我们首先创建一个 dataSource: RxTableViewSectionedReloadDataSource<SectionModel<String, Double>>:
let dataSource = RxTableViewSectionedReloadDataSource<SectionModel<String, Double>>(
    configureCell: { (_, tv, indexPath, element) in
        let cell = tv.dequeueReusableCell(withIdentifier: "Cell")!
        cell.textLabel?.text = "\(element) @ row \(indexPath.row)"
        return cell
    },
    titleForHeaderInSection: { dataSource, sectionIndex in
        return dataSource[sectionIndex].model
    }
)
通过使用这个辅助类型,我们就不用执行数据源代理方法,而只需要提供必要的配置函数就可以布局列表页了。
第一个函数 configureCell 是用来配置 Cell 的显示,而这里的参数 element 就是 SectionModel<String, Double> 中的 Double。
第二个函数 titleForHeaderInSection 是用来配置 Section 的标题,而 dataSource[sectionIndex].model 就是 SectionModel<String, Double> 中的 String。
然后为列表页订制一个多层级的数据源 items: Observable<[SectionModel<String, Double>]>,用这个数据源来绑定列表页。
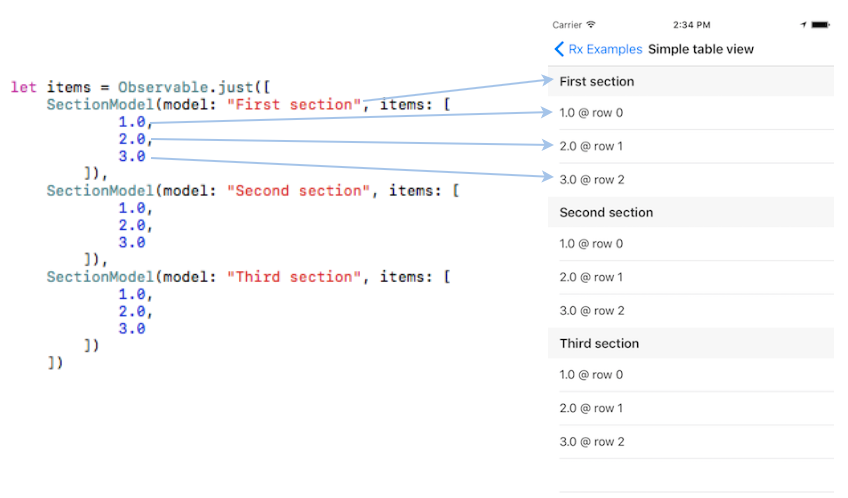
这里 SectionModel<String, Double> 中的 String 是用来显示 Section 的标题。而 Double 是用来绑定对应的 Cell。假如我们的列表页是用来显示通讯录的,并且通讯录通过首字母来分组。那么应该把数据定义为 SectionModel<String, Person>,然后用首字母 String 来显示 Section 标题,用联系人 Person 来显示对应的 Cell。
由于 SectionModel<Section, ItemType> 是一个范型,所以我们可以用它来定义任意类型的 Section 以及 Item。
最后:
override func viewDidLoad() {
    super.viewDidLoad()

    ...

    tableView.rx
        .setDelegate(self)
        .disposed(by: disposeBag)
}

...

func tableView(_ tableView: UITableView, heightForHeaderInSection section: Int) -> CGFloat {
    return 40
}
这个是用来控制行高的,tableView.rx.setDelegate(self)... 将自己设置成 tableView 的代理,通过 heightForHeaderInSection 方法提供行高。